
Live! Session #8 – Updates | Price-Friendly Chinese Music Inst. | What A Wonderful World
May 9, 2025
Your Child Just Joined Guzheng CCA? Parents Read This!
May 9, 2025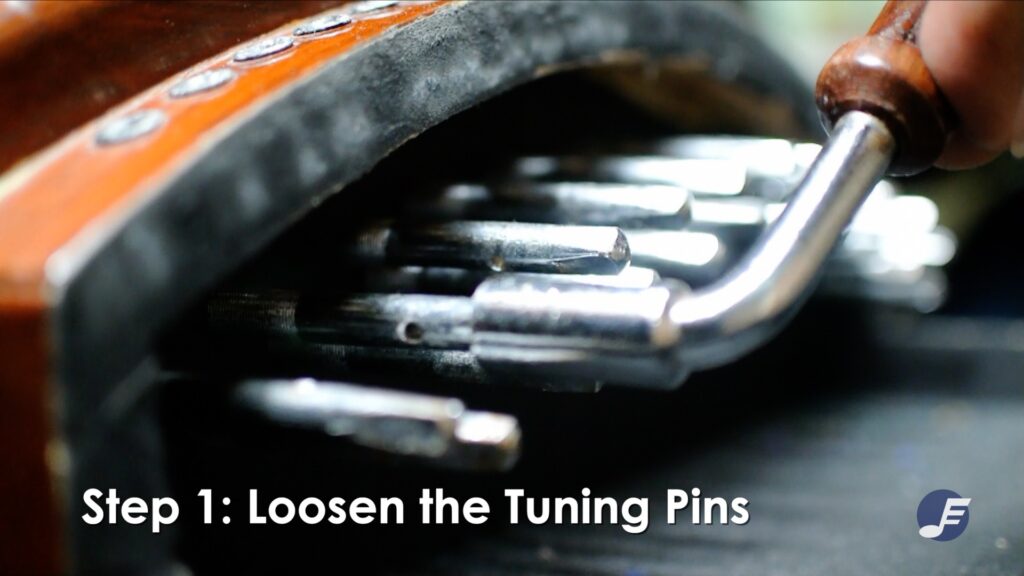
How to Replace a Guzheng String: Step-by-Step Guide for Beginners
Welcome back to another EMTV tutorial! This time, we’re diving into something many Guzheng players face sooner or later—how to replace a broken Guzheng string.
If you’ve been practicing regularly, chances are you’ve snapped a string or two. No worries—this guide is here to help you get your instrument back in shape.
Understanding Your Guzheng String Layout
Before we start, let’s quickly go over some Guzheng basics to avoid confusion.
Each Guzheng typically has 21 strings, with String No.1 being the thinnest and closest to you when you’re seated in playing position. As you move away from yourself, the string numbers increase, with String No.21 being the thickest.

From the bottom, string no.1, all the way to string no.21 at the top
 Same things apply on the left side of the Guzheng
Here’s the twist: when you flip the Guzheng over, this order reverses. String No.1 is now at the top, and String No.21 is at the bottom. Keep this in mind—it’s a common point of confusion!
 Bottom view of the Guzheng
Step 1: Loosen the Tuning Pin
 The rows of pins to loosen
Before inserting the new string, always loosen the tuning pin. Turn the tuning wrench towards you about 3–5 times.
Why? Tightening from the same point as where the string broke can force the pin deeper into the wood, risking internal cracks. Conversely, loosening too much may cause the pin to pull out when tuning.

Loosened pins touching the top part of the Guzheng
Aim for the pin to stick out slightly like this:

The desired length of pin sticking out
Step 2: Insert the Replacement String

How to insert the replacement string
Now, flip the Guzheng over and insert the replacement string (we’ll use String No.3 in this example) into the correct hole. Pull it all the way through until the metal stopper touches the wood.
Flip the Guzheng back, bring the string over the body, and slot it into hole No.3 at the tuning pin area.
Step 3: Create a Self-Locking Loop

Create a Self-Locking Loop
This step is crucial. As you wind the string, create a self-locking loop with the excess string around the tuning pin. This helps prevent slippage and ensures tuning stability.
Need help visualizing it? Watch our EMTV episode where we demonstrate it in real time.
Step 4: Position the Bridge

Adding the Bridge Beneath the New String
Once the string is installed, place the correct bridge underneath it. The bridges go from shortest (String 1) to tallest (String 21).
Here are recommended bridge distances from the right side of the Guzheng (for D major tuning):
| String | Distance |
|---|---|
| 1 | 15.5 cm |
| 2 | 18 cm |
| 3 | 20 cm |
| 4 | 23 cm |
| 5 | 26 cm |
| 6 | 28.5 cm |
| 7 | 32 cm |
| 8 | 34 cm |
| 9 | 38 cm |
| 10 | 42.5 cm |
| 11 | 46.5 cm |
| 12 | 51 cm |
| 13 | 55 cm |
| 14 | 59 cm |
| 15 | 63 cm |
| 16 | 67.5 cm |
| 17 | 72 cm |
| 18 | 75 cm |
| 19 | 80 cm |
| 20 | 84.5 cm |
| 21 | 90 cm |
Don’t Panic if a String Snaps Again!
It might take a few tries to get it right—and that’s okay! If you’re still struggling, feel free to contact us for a one-on-one tutorial or book a restringing session.
Ready to try it yourself? Watch the full tutorial in our EMTV episode here.
Learn More from EMTV
We cover everything from tuning to repairs to playing techniques. Subscribe to our newsletter and follow us on Facebook and Instagram for updates every Friday at 5 PM!

